Showing posts with label Blogger Tutorial. Show all posts

0 How to Install YM Emoticons in Blogger Editor & Comments Editor


Hello friends how are you all? hopefully doing well .if there used to be the trick is to use Greasemonkey for emoticons appear above the editor, more precisely in the tittle and the post editor. but the problem is already not working back at blogger .

but dont worry This time I found a trick that may be practically almost similar . you just need to write any code in your blog.

here we go
  • find this code ]]></b:skin>
  • copy the script below, then paste it under the ]]></ b: skin>
<script src='http://jancok.googlecode.com/files/Editor%20Smyle.js' type='text/javascript'/>
  • Save your template 
  • if you write an article on your blog, enter the code below
: )   = 
: p  = 
: ~  = 
: L  = 
; )  = 
: s  = 
: $  = 
: y  = 
: (  =
: t  = 
: o =
: O = 
: r  =
: k  =
: v  =
: @ =
: d  = 
: D = 
: #  =
: f  =
: x  =
: c  =
: z  =   
how to put the code on your blogger post?
note the illustration below


the result will be like
text TEXT text TEXT .

  • Enjoy
Read more

0 Making TabView with jQueryLibrary


If you search from Google you will found many way to make Tabbed Sidebar but Difficult to implement in blogger, because we have to modify HTML or XML in Sidebar Part. This Trick is very easy only put CSS and JS. The JS will automatic make structure for Tabbed and we don’t have to modify in Sidebar Part.
So this trick will not mess up you html and disturb your sidebar. After put js You can change position or content of sidebar, it was very easy.
Here are some features of my method:
  • Easy to install.
  • No need edit html in Sidebar part.
  • Automatically place your handpicked widgets inside tabs.
  • Freedom to set what widgets stay out of the tabs.
  • After implementing, Widgets are normally edited from Page Elements section. 
 So how do I make it? easy...
  • Find this code ]]></b:skin>
  • replace with the code below
/* Tabbed Sidebar Widgets
--------------------------------- */
.widget-wrapper2{
border:1px solid #494e52;
background-color:#636d76;
padding:8px;
}

.widget-tab {
-moz-border-radius-bottomleft:5px;
-moz-border-radius-bottomright:5px;
-moz-border-radius-topright:5px;
-webkit-border-radius-bottomleft:5px;
-webkit-border-radius-bottomright:5px;
-webkit-border-radius-topright:5px;
background:#FFFFFF url(http://i195.photobucket.com/albums/z105/dantearaujo/tabcontentbg.gif) repeat-x scroll left bottom !important;
border:1px solid #CFCFCF;
font-family:Arial,Helvetica,sans-serif;
padding:15px !important;
}

.widget-tab  ul {
margin:0px;
padding:0px 20px 0px 20px;
}
.widget-tab  ul li {
list-style:none;
border-bottom:1px solid #d6dde0;
padding-top:10px;
padding-bottom:10px;
font-size:13px;
}
.widget-tab  ul li:last-child {
border-bottom:none;
}
.widget-tab  ul li a {
text-decoration:none;
color:#3e4346;
}
.widget-tab  ul li a small {
color:#8b959c;
font-size:9px;
text-transform:uppercase;
font-family:Verdana, Arial, Helvetica, sans-serif;
position:relative;
left:4px;
top:0px;
}
.tab-content  ul li a:hover {
color:#a59c83;
}
.tab-content  ul li a:hover small {
color:#baae8e;
}

.active-tab{
background:#FFFFFF url(http://i195.photobucket.com/albums/z105/dantearaujo/tabtopbg.gif) repeat-x scroll left top !important;
border-color:#CFCFCF #CFCFCF #FFFFFF #CFCFCF !important;
border-style:solid !important;
border-width:1px 1px 2px !important;
color:#282E32 !important;       

}

ul.tab-wrapper {
margin:0px; padding:0px;
margin-top:5px;
margin-bottom:6px;
}
ul.tab-wrapper li {
-webkit-border-radius-topleft:5px;
-webkit-border-radius-topright:5px;
-moz-border-radius-topleft:5px;
-moz-border-radius-topright:5px;
background:#191919 url(http://i195.photobucket.com/albums/z105/dantearaujo/tabinactivebg.gif) repeat-x scroll left top;
border:1px solid #464C54;
color:#FFFFFF;
cursor:pointer;
display:inline;
font-family:Verdana,Arial,Helvetica,sans-serif;
font-size:9px;
font-weight:bold;
line-height:2em;
list-style-image:none !important;
list-style-position:outside !important;
list-style-type:none !important;
margin-right:1px;
padding:8px 14px;
text-align:center;
text-decoration:none;
text-transform:uppercase;
}
]]></b:skin>
  • This script needs the jQuery JavaScript library, if you already have it installed, you can skip this step, if you don’t just paste the code below right before your </head> line:

<!-- jQuery Call -->

<script src='http://ajax.googleapis.com/ajax/libs/jquery/1.2.6/jquery.min.js' type='text/javascript'/>

<!-- End of jQuery Call -->
  • Ok now that you’ve made sure that you have jQuery installed, you need to install the script that will do all the magic for us, just place the following code right before your </head> line

<script type="text/javascript">
var starttab=0;
var endtab=2;
var sidebarname="sidebar1";
</script>
<script type="text/javascript" src="http://scriptabufarhan.googlecode.com/svn/trunk/bloggertabv1.0-min.js"></script>
  • Customizing

As you have noted you’ll get a few lines that can be customized, those are:
var starttab=0;
var endtab=2;
var sidebarname="sidebar";

Very quickly: starttab is the starting number for your chosen widgets, it starts counting from 0. endtab is the number for your last included widget. sidebarname is your sidebar’s id, it is generally just “sidebar”, but just in case you have a different id, we’ll help you finding the right one to place here.
  • How to find your sidebar’s ID

Ok if you have installed the script and it is not working, you may have a different sidebar ID that is not only “sidebar”, use the following methods to find he right id of your sidebar.
  • Method 1 – Getting from the HTML

This one may be the fastest one, if you use Minima template, or any template derived from it, just go to Layout > Edit HTML > Search for “sidebar-wrapper” and you may get something like this:

<div id='sidebar-wrapper'>

<b:section class='sidebar' id='sidebar' preferred='yes'>
Just take a closer look and you will find it id=’sidebar’.

What are the Gadget Numbers

Here is a simple explanation for those who haven’t understand the numbers yet. Let’s say that you want make tabs out of your first 3 widgets, so your starting number will be 0 and your finishing number will be 2:
var starttab=0;
var endtab=2;
var sidebarname="sidebar";

Check images below for better understanding:
image
image
In this case, Widget 3 and 4 will not get any tabs, because your finishing number was 2. Very easy huh?

Advices

  • This script works for only one sidebar per blog.
  • We have included a general styles for your tabs, however, you can use your CSS skills to customize them, but be aware that CSS related errors will not be supported here, make sure you do the right thing.
  • All the tabbed widgets need to have a title.
Read more

2 Make a Slide Like Kompas.com at Blogspot


how do you think? interesting? yea I know it look more professional instead, right?. so how to install it on your blog? easy just follow my instruction
  • Go to Design Edit HMTL 
  • Download Full Template ( recomended )
  • Then look for the code </ head> (by way of CTRL + F then type in the code)


  • now replace the code </ head> with the script below

<script type='text/javascript'>
//<![CDATA[
//** Tab Content script v2.0- © Dynamic Drive DHTML code library (http://www.dynamicdrive.com)
//** Updated Oct 7th, 07 to version 2.0. Contains numerous improvements:
// -Added Auto Mode: Script auto rotates the tabs based on an interval, until a tab is explicitly selected
// -Ability to expand/contract arbitrary DIVs on the page as the tabbed content is expanded/ contracted
// -Ability to dynamically select a tab either based on its position within its peers, or its ID attribute (give the target tab one 1st)
// -Ability to set where the CSS classname "selected" get assigned- either to the target tab's link ("A"), or its parent container
//** Updated Feb 18th, 08 to version 2.1: Adds a "tabinstance.cycleit(dir)" method to cycle forward or backward between tabs dynamically
//** Updated April 8th, 08 to version 2.2: Adds support for expanding a tab using a URL parameter (ie: http://mysite.com/tabcontent.htm?tabinterfaceid=0)

////NO NEED TO EDIT BELOW////////////////////////

function ddtabcontent(tabinterfaceid){
this.tabinterfaceid=tabinterfaceid //ID of Tab Menu main container
this.tabs=document.getElementById(tabinterfaceid).getElementsByTagName("a") //Get all tab links within container
this.enabletabpersistence=true
this.hottabspositions=[] //Array to store position of tabs that have a "rel" attr defined, relative to all tab links, within container
this.currentTabIndex=0 //Index of currently selected hot tab (tab with sub content) within hottabspositions[] array
this.subcontentids=[] //Array to store ids of the sub contents ("rel" attr values)
this.revcontentids=[] //Array to store ids of arbitrary contents to expand/contact as well ("rev" attr values)
this.selectedClassTarget="link" //keyword to indicate which target element to assign "selected" CSS class ("linkparent" or "link")
}

ddtabcontent.getCookie=function(Name){
var re=new RegExp(Name+"=[^;]+", "i"); //construct RE to search for target name/value pair
if (document.cookie.match(re)) //if cookie found
return document.cookie.match(re)[0].split("=")[1] //return its value
return ""
}

ddtabcontent.setCookie=function(name, value){
document.cookie = name+"="+value+";path=/" //cookie value is domain wide (path=/)
}

ddtabcontent.prototype={

expandit:function(tabid_or_position){ //PUBLIC function to select a tab either by its ID or position(int) within its peers
this.cancelautorun() //stop auto cycling of tabs (if running)
var tabref=""
try{
if (typeof tabid_or_position=="string" && document.getElementById(tabid_or_position).getAttribute("rel")) //if specified tab contains "rel" attr
tabref=document.getElementById(tabid_or_position)
else if (parseInt(tabid_or_position)!=NaN && this.tabs[tabid_or_position].getAttribute("rel")) //if specified tab contains "rel" attr
tabref=this.tabs[tabid_or_position]
}
catch(err){alert("Invalid Tab ID or position entered!")}
if (tabref!="") //if a valid tab is found based on function parameter
this.expandtab(tabref) //expand this tab
},

cycleit:function(dir, autorun){ //PUBLIC function to move foward or backwards through each hot tab (tabinstance.cycleit('foward/back') )
if (dir=="next"){
var currentTabIndex=(this.currentTabIndex<this.hottabspositions.length-1)? this.currentTabIndex+1 : 0
}
else if (dir=="prev"){
var currentTabIndex=(this.currentTabIndex>0)? this.currentTabIndex-1 : this.hottabspositions.length-1
}
if (typeof autorun=="undefined") //if cycleit() is being called by user, versus autorun() function
this.cancelautorun() //stop auto cycling of tabs (if running)
this.expandtab(this.tabs[this.hottabspositions[currentTabIndex]])
},

setpersist:function(bool){ //PUBLIC function to toggle persistence feature
this.enabletabpersistence=bool
},

setselectedClassTarget:function(objstr){ //PUBLIC function to set which target element to assign "selected" CSS class ("linkparent" or "link")
this.selectedClassTarget=objstr || "link"
},

getselectedClassTarget:function(tabref){ //Returns target element to assign "selected" CSS class to
return (this.selectedClassTarget==("linkparent".toLowerCase()))? tabref.parentNode : tabref
},

urlparamselect:function(tabinterfaceid){
var result=window.location.search.match(new RegExp(tabinterfaceid+"=(\d+)", "i")) //check for "?tabinterfaceid=2" in URL
return (result==null)? null : parseInt(RegExp.$1) //returns null or index, where index (int) is the selected tab's index
},

expandtab:function(tabref){
var subcontentid=tabref.getAttribute("rel") //Get id of subcontent to expand
//Get "rev" attr as a string of IDs in the format ",john,george,trey,etc," to easily search through
var associatedrevids=(tabref.getAttribute("rev"))? ","+tabref.getAttribute("rev").replace(/s+/, "")+"," : ""
this.expandsubcontent(subcontentid)
this.expandrevcontent(associatedrevids)
for (var i=0; i<this.tabs.length; i++){ //Loop through all tabs, and assign only the selected tab the CSS class "selected"
this.getselectedClassTarget(this.tabs[i]).className=(this.tabs[i].getAttribute("rel")==subcontentid)? "selected" : ""
}
if (this.enabletabpersistence) //if persistence enabled, save selected tab position(int) relative to its peers
ddtabcontent.setCookie(this.tabinterfaceid, tabref.tabposition)
this.setcurrenttabindex(tabref.tabposition) //remember position of selected tab within hottabspositions[] array
},

expandsubcontent:function(subcontentid){
for (var i=0; i<this.subcontentids.length; i++){
var subcontent=document.getElementById(this.subcontentids[i]) //cache current subcontent obj (in for loop)
subcontent.style.display=(subcontent.id==subcontentid)? "block" : "none" //"show" or hide sub content based on matching id attr value
}
},

expandrevcontent:function(associatedrevids){
var allrevids=this.revcontentids
for (var i=0; i<allrevids.length; i++){ //Loop through rev attributes for all tabs in this tab interface
//if any values stored within associatedrevids matches one within allrevids, expand that DIV, otherwise, contract it
document.getElementById(allrevids[i]).style.display=(associatedrevids.indexOf(","+allrevids[i]+",")!=-1)? "block" : "none"
}
},

setcurrenttabindex:function(tabposition){ //store current position of tab (within hottabspositions[] array)
for (var i=0; i<this.hottabspositions.length; i++){
if (tabposition==this.hottabspositions[i]){
this.currentTabIndex=i
break
}
}
},

autorun:function(){ //function to auto cycle through and select tabs based on a set interval
this.cycleit('next', true)
},

cancelautorun:function(){
if (typeof this.autoruntimer!="undefined")
clearInterval(this.autoruntimer)
},

init:function(automodeperiod){
var persistedtab=ddtabcontent.getCookie(this.tabinterfaceid) //get position of persisted tab (applicable if persistence is enabled)
var selectedtab=-1 //Currently selected tab index (-1 meaning none)
var selectedtabfromurl=this.urlparamselect(this.tabinterfaceid) //returns null or index from: tabcontent.htm?tabinterfaceid=index
this.automodeperiod=automodeperiod || 0
for (var i=0; i<this.tabs.length; i++){
this.tabs[i].tabposition=i //remember position of tab relative to its peers
if (this.tabs[i].getAttribute("rel")){
var tabinstance=this
this.hottabspositions[this.hottabspositions.length]=i //store position of "hot" tab ("rel" attr defined) relative to its peers
this.subcontentids[this.subcontentids.length]=this.tabs[i].getAttribute("rel") //store id of sub content ("rel" attr value)
this.tabs[i].onclick=function(){
tabinstance.expandtab(this)
tabinstance.cancelautorun() //stop auto cycling of tabs (if running)
return false
}
if (this.tabs[i].getAttribute("rev")){ //if "rev" attr defined, store each value within "rev" as an array element
this.revcontentids=this.revcontentids.concat(this.tabs[i].getAttribute("rev").split(/s*,s*/))
}
if (selectedtabfromurl==i || this.enabletabpersistence && selectedtab==-1 && parseInt(persistedtab)==i || !this.enabletabpersistence && selectedtab==-1 && this.getselectedClassTarget(this.tabs[i]).className=="selected"){
selectedtab=i //Selected tab index, if found
}
}
} //END for loop
if (selectedtab!=-1) //if a valid default selected tab index is found
this.expandtab(this.tabs[selectedtab]) //expand selected tab (either from URL parameter, persistent feature, or class="selected" class)
else //if no valid default selected index found
this.expandtab(this.tabs[this.hottabspositions[0]]) //Just select first tab that contains a "rel" attr
if (parseInt(this.automodeperiod)>500 && this.hottabspositions.length>1){
this.autoruntimer=setInterval(function(){tabinstance.autorun()}, this.automodeperiod)
}
} //END int() function

} //END Prototype assignment

//]]>
</script>

</head>

  • Next Find this code ]]></b:skin>
  • Replace that code with code CSS below

  • kemudian anda Ganti kode ]]></b:skin>  dengan kode CSS di bawah ini
 /* Start Slide*/
.img400{width:300px;height:250px;}.img400 img{width:297px;height:250px;border:2px solid#000;z-index:80;}.cursor{cursor:pointer;}.h250{height:250px;}.min250{margin-top:-250px;}.des_4{background:#000;padding:3px 8px;filter:alpha(opacity=80);-moz-opacity:.80;opacity:.80;width:80px;color:#F60;margin-bottom:2px;z-index:990;}.des_1{background:#000;height:57px;padding:3px 10px 0 10px;filter:alpha(opacity=75);-moz-opacity:.75;opacity:.75;z-index:990;}.des_1a{background:#000;height:50px;padding:10px 10px 0 10px;filter:alpha(opacity=75);-moz-opacity:.75;opacity:.75;margin-top:-60px;}.font16{font-size:13px;}.font16{font-size:14px;}.c_white{color:#FFF;}.c_white a{text-decoration:none;color:#FFF;}.c_white a:hover{text-decoration:underline;}.page_hl a{font:bold 12px arial;color:#FFF;text-decoration:none;padding:2px 5px;display:inline;background:#000000;filter:alpha(opacity=95);-moz-opacity:.95;opacity:.95;}.page_hl a:hover,.page_hl a.selected{color:#fff;text-decoration:none;background:#000;filter:alpha(opacity=60);-moz-opacity:.60;opacity:.60;}.page_hl span a{color:#FFF;text-decoration:none;background:#F30;filter:alpha(opacity=90);-moz-opacity:.90;opacity:.90;}.pd_5{padding:5px;}.clearit{clear:both;margin:0;padding:0;}.pb_10{padding-bottom:10px;}

]]></b:skin>

  •  
  • wait isnt over yet...Grrrr
  • Go to Design ► Page Elements 
  • select the sidebar you want to attach slide
  • Add GadgetHTML/JavaScript
Note : I recommend you have your sidebar width 300px and height 250px 
My SideBar


  • then you paste the code below
<div id="gal1" class="img400">
<div class="h250"><img alt="" src="https://blogger.googleusercontent.com/img/b/R29vZ2xl/AVvXsEi09-eX8iyZUsQdQ3wgf9fkpm5GaTt5Ugsg2pBdKxKZvZaHA9WVYd2pM3AYGtr4ZRDsX7iR-_UFJzxjFcixe1NRDusfAoiJetlDfI9d8flScqXgWH3w7EOwd5mxbluWkSJF74zX6v6jU8o/s1600/1.jpg" /></div>
<div class="min250">
<div style="margin-top:168px;" class="des_4"><strong>HEADLINE</strong></div>
<div class="des_1 font16 c_white"><span class="font11 c_orange">PC Games</span><br /><a href="http://bendol-online.blogspot.com/2011/02/crysis-2-beta-2011-pc-game-mediafire.html"><strong>Crysis 2 Beta (2011)</strong></a>
</div>
</div>
</div><div id="gal2" style="display:none;" class="img400">
<div class="h250"><img alt="" src="https://blogger.googleusercontent.com/img/b/R29vZ2xl/AVvXsEjaaeDpBbWKUyK-g3ZPafim7LJCODhBAgcn0TYgHIov-frdAaCR5Om-PFNB9c7A1KIGgsytuMJczgI_w_z0W1T_lmfWcqRvtQYrOabJx7AsfsSDMNpXNNkz1y70ba317b1vHWjkYpekvNQ/s1600/1.jpg" /></div>
<div class="min250">
<div style="margin-top:168px;" class="des_4"><strong>HEADLINE</strong></div>
<div class="des_1 font16 c_white"><span class="font11 c_orange">PC Games</span><br /><a href="http://bendol-online.blogspot.com/2011/02/test-drive-unlimited-2-2011-skidrow.html"><strong>Test Drive Unlimited 2</strong></a>
</div>
</div>
</div><div id="gal3" style="display:none;" class="img400">
<div class="h250"><img alt="" src="https://blogger.googleusercontent.com/img/b/R29vZ2xl/AVvXsEjiBOwb43C2SDAjOkvVNUtGC6EuW5lt-0cfxDjv0GRBLKWxURNGuhrjoDfBSHNDPMTKlauqR_4eqoIqoXL6bDJj7FDvYo2bzvQ7N3k-MzcmpaIG_IvqMSveRT__zMpPa6gtiUX_n80Ajno/s1600/1.jpg&cat=1&pid=2107&cache=false" /></div>
<div class="min250">
<div style="margin-top:168px;" class="des_4"><strong>HEADLINE</strong></div>
<div class="des_1 font16 c_white"><span class="font11 c_orange">PC Games</span><br /><a href="http://bendol-online.blogspot.com/2011/02/motogp-08-pc-games-mediafire.html"><strong>MotoGP 08</strong></a>
</div>
</div>
</div><div id="gal4" style="display:none;" class="img400">
<div class="h250"><img alt="" src="http://i56.tinypic.com/2jayk5y.jpg" /></div>
<div class="min250">
<div style="margin-top:168px;" class="des_4"><strong>HEADLINE</strong></div>
<div class="des_1 font16 c_white"><span class="font11 c_orange">PC Games</span><br /><a href="http://bendol-online.blogspot.com/2010/12/pes-pro-evolution-soccer-2011-reloaded.html"><strong>PES : 2011</strong></a>
</div>
</div>
</div><div id="gal5" style="display:none;" class="img400">
<div class="h250"><img alt="" src="https://blogger.googleusercontent.com/img/b/R29vZ2xl/AVvXsEjFr5RwUQIl3QCnswF0LaKr8dYLwVcx8y1V97btvDLnjOF9PPUnKs42eeZZU7924-OsRNaaVDd2bKdWX995tQFaN6uJEcuOnhDQ3loS02YAF8M_hdy7jjtX-lRPRHLE7vu85jaAFu5JgL4/s1600/aaa18682.jpg" /></div>
<div class="min250">
<div style="margin-top:168px;" class="des_4"><strong>HEADLINE</strong></div>
<div class="des_1 font16 c_white"><span class="font11 c_orange">PC Games (18+ ? LoL )</span><br /><a href="http://bendol-online.blogspot.com/2010/12/bully-scholarship-edition-procyon-pc.html"><strong>Bully: Scholarship</strong></a>
</div>
</div>
</div><div style="height:250px; margin-top:-250px;"><div id="galtabs" class="page_hl pd_5"><a href="#" rel="gal1">1</a> <a href="#" rel="gal2">2</a> <a href="#" rel="gal3">3</a> <a href="#" rel="gal4">4</a> <a href="#" rel="gal5">5</a> </div></div><div class="clearit"></div>
<div class="clearit pb_10"></div>
<script type="text/javascript">
var myheads=new ddtabcontent("galtabs");myheads.setpersist(false);myheads.setselectedClassTarget("link");myheads.init(5000)
</script>
Red : Picture ( For Slide 1,2,3,4 and 5 )
Blue : Link from the article
Pink : Title
  • Done 
  • if have problem let me know and i'll try to help ya 
  • Enjoy
Read more

0 How to make Facebook, Twitter, RSS, Feed with Tooltips JQuery in blogger


For DEMO Look at my other Blogs Here


This time I will share with you how to add Facebook, Twitter, RSS, and subscribe via email. as you see the picture above.or you can view it directly on this blog.as seen interesting isnt it?


all the scripts and css I took from my own template,
Alright here we go...
  • Find this code ]]></b:skin>
  • Replace that code with the code below
/*** Tooltips ***/
#iconwrap{margin:5px 0 0 0; width:125px; height:38px; float:right;}
.facebooktooltip{margin:0; padding:0; width:16px; position:relative}
.facebooktooltip em{background:url(https://blogger.googleusercontent.com/img/b/R29vZ2xl/AVvXsEhwnh3KWerXN3Zrcj1vTxLcupRKjhqSKaZE3poH1D_V1qaS9QCc4vG9gy81nVt6Fxm5CBDuGV3zjQLdRPyEkw29qyO9wF1X-TyBp2h5H4N45tjYW7CP3W5VhUbjpAfwQYNd30nx-D-K6Sc/) no-repeat; width:100px; height:30px; position:absolute; top:-60px; left:-27px; text-align:center; text-indent:-9999px; z-index:2; display:none}
#facebook-icon{width:25px; height:24px; background:url(https://blogger.googleusercontent.com/img/b/R29vZ2xl/AVvXsEg6PyXdm5IwWdC1-k1gXJBH12wA1vvjbbqlNoEL-8C8zJ_ZDiN2Vn1NSYhgwI_Ef40cU4BFUtOM_YttI1sMk90eNTQn0cVJ0Xu6EPAwcOdqT3BSDonxFs97g9wcl4C5x1XrA9D6ZwoD5AIY/) no-repeat 0 0; text-indent:-9999px; margin:0 5px 0 0; display:block; opacity:0.85; left:0px; position:absolute;}
#facebook-icon:hover{opacity:1.0}
.twittertooltip{margin:0; padding:0; width:100px; position:relative}
.twittertooltip em{background:url(https://blogger.googleusercontent.com/img/b/R29vZ2xl/AVvXsEjPyMDSx9nQpywliNUC3L-6Q-ecr31tVYBOeGaNfoREa2pkKQFk6Sl84lqBYdOMb16uTnmK-6lhp2QkGUENyTYjAhWpLtlE_RJVZROBVUc_U9X3Jm6-tTQAOwmmKyqsp41hR0-y-5xp_WvA/) no-repeat; width:100px; height:30px; position:absolute; top:-60px; left:8px; text-align:center; text-indent:-9999px; z-index:2; display:none;}
#twitter-icon{width:25px; height:24px; background:url(https://blogger.googleusercontent.com/img/b/R29vZ2xl/AVvXsEgNfM5FjK7M77Rb1APFPSNae04Hr-6JMKbQuDuKVjRumIl17y6nOi01ashZPDDzVi7yz6nz3Ac-29rMRQMSQAPs5eebJ-oaHGK7w5yjjmffDE_Hmngf6hDoSmVdyYsXwk-QOsHnMN54gWnN/) no-repeat 0 0; text-indent:-9999px; margin:0; display:block; opacity:0.85; left:30px; position:absolute;}
#twitter-icon:hover{opacity:1.0}
.rsstooltip{margin:0; padding:0; width:300px; position:relative}
.rsstooltip em{background:url(https://blogger.googleusercontent.com/img/b/R29vZ2xl/AVvXsEjPsRWoGjtsZuN2An79iBvzx6Fks9Hd9ZTAvVRbebzZV7vBYhpVJvY2sWAF78Y-WjH1oehYWolLB-IUiaXY5mluK9ltCVTPs9LrO4jPdwhHVjsJm_RcLr4YTGKU3axSW4wbob5RCFkxEj0/) no-repeat; width:100px; height:30px; position:absolute; top:-60px; left:38px; text-align:center; text-indent:-9999px; z-index:2; display:none}
#rss-icon{width: 25px;height: 24px;background: url(https://blogger.googleusercontent.com/img/b/R29vZ2xl/AVvXsEhSOrqXZV5BG0NtLOZsi72gJ_Pf3xvlmL71N1jYQ3X5mdWaPDehKWZd02gpLw0YRHJ3ZClCcdpK-XUJtCAOXpKsRpFCYxeb583vZgs6D9xxowl0QZzC9QlmVfJS3YPCWUFMj-C_tPgpvkFR/) no-repeat 0 0;text-indent: -9999px;margin: 0 10px;display: block;opacity: 0.85;left:50px;position:absolute;}
#rss-icon:hover{opacity: 1.0}
.emailtooltip{margin:0;padding:0;width:300px;position:relative}
.emailtooltip em{background: url(https://blogger.googleusercontent.com/img/b/R29vZ2xl/AVvXsEgIdyU-IP7Jvch-97GzMLoqGqUPhlon8X56Bxoz2p0Zsoofd4rIXv_Onn3nqpB7iwuU4lURnQfdID56TDswIIp7gF8VVYhr57CVbQLHXgckAK2aZ0X7XlZgYBuREeH_0okHmJLFFBiwS-k/) no-repeat;width:100px;height:30px;position:absolute;top:-60px;left:68px;text-align:center;text-indent:-9999px;z-index:2;display:none;}
#email-icon{width: 25px;height: 24px;background: url(https://blogger.googleusercontent.com/img/b/R29vZ2xl/AVvXsEjdWgWzg8zbaCNXyVHwa25P3T7STFTdA_bckqpEI0pWgRa4H6iZI91EnOqxjTZrZPYgxlulMZjBoI9Igjf2enshNXnyXXuWfsDBEg4e-OET0xTDmDRwhnSVoDHQ_x4G1PVfBfbneED9H4Uw/) no-repeat 0 0;text-indent:-9999px;margin: 0 10px;display: block;opacity: 0.85;left:80px;position:absolute;}
#email-icon:hover{opacity: 1.0}
.status-msg-wrap{width:99%;margin-top:0}
.status-msg-border{border:1px solid #C9C7C7}

]]></b:skin> 


  • go to your Dashboard
  • then go to DesignEdit HTML
  • Then find </body>
  • and Replace kode </body> with code below

<!-- jQuery -->
<script src='http://jancok.googlecode.com/files/jquery.minUser.js' type='text/javascript'/>

<!-- begin Tooltips -->
<script type='text/javascript'>
var $j = jQuery.noConflict();
$j(document).ready(function(){$j(&quot;.rsstooltip a&quot;).hover(function()
{$j(this).next(&quot;em&quot;).stop(true, true).animate({opacity: &quot;show&quot;, top: &quot;-35&quot;}, &quot;slow&quot;);}, function() {$j(this).next(&quot;em&quot;).animate({opacity: &quot;hide&quot;, top: &quot;-30&quot;}, &quot;fast&quot;);});});$j(document).ready(function(){$j(&quot;.facebooktooltip a&quot;).hover(function() {$j(this).next(&quot;em&quot;).stop(true, true).animate({opacity: &quot;show&quot;, top: &quot;-35&quot;}, &quot;slow&quot;);}, function() {$j(this).next(&quot;em&quot;).animate({opacity: &quot;hide&quot;, top: &quot;-30&quot;}, &quot;fast&quot;);});});$j(document).ready(function(){$j(&quot;.twittertooltip a&quot;).hover(function(){$j(this).next(&quot;em&quot;).stop(true, true).animate({opacity: &quot;show&quot;, top: &quot;-35&quot;}, &quot;slow&quot;);}, function() {$j(this).next(&quot;em&quot;).animate({opacity: &quot;hide&quot;, top: &quot;-30&quot;}, &quot;fast&quot;);});});$j(document).ready(function(){$j(&quot;.emailtooltip a&quot;).hover(function() {$j(this).next(&quot;em&quot;).stop(true, true).animate({opacity: &quot;show&quot;, top: &quot;-35&quot;}, &quot;slow&quot;);}, function() {$j(this).next(&quot;em&quot;).animate({opacity: &quot;hide&quot;, top: &quot;-30&quot;}, &quot;fast&quot;);});});
</script>

</body>

  • Save your Template 
  • Now go to Page Elements
  • Add Gadget ► HTML/JavaScript
  • Leave the title empty, and in the content area paste the following code.

<div id='iconwrap'>
<div class='facebooktooltip'>
<a href='http://www.facebook.com/pages/Blogger-Tutorialz/110157202393121' id='facebook-icon'/>
<em>Join our community on Facebook</em>
</div>
<div class='twittertooltip'>

<a href='http://twitter.com/bendol212' id='twitter-icon'/>
<em>Follow my Twitter</em>
</div>
<div class='rsstooltip'>
<a href='http://feeds.feedburner.com/blogger-tutorialz' id='rss-icon'/>
<em>RSS</em>
</div>
<div class='emailtooltip'>
<a href='http://feedburner.google.com/fb/a/mailverify?uri=blogger-tutorialz' id='email-icon'/>
<em>RSS</em>
</div>
</div>

  • I've marked you need to replace by your own 
  • I guess you already know that I mark  (if you do not know please ask in the comment box below) easy
  • After you replace the Blue, cyan, and Red please save your widget
  • And see your blog 


hmm...I think your blog looks more professional now, do you agree? ya ya ya...i know... Enjoy
Read more

0 How to make "BREADCRUMB" in Blogger

If you are an observer of revolution theme created by Brian Gardner, you might have seen a simple row of navigation above the title of an article that you’re reading, like the following screenshot:


The navigation like above is known better by the name of “breadcrumb-navigation”. With the “breadcrumb-navigation” the readers can easily know the position of an article that’s being read and also can search the articles in the same category.
Can “breadcrumb-navigation” be installed in blogger? The answer is of course, it can. With a few modifications of your template code, then the “breadcrumb-navigation” will be yours soon. Below are the ways:

  1. Please log in to blogger with your ID
  2. Click Layout
  3. Click Edit HTML tab
  4. Click Download Full Template and please back up your template first
  5. Please check the small box beside Expand Widget Template
    expand
  6. Find the code ]]></b:skin>
  7. Copy and paste the code below exactly above the code ]]></b:skin>
    .breadcrumbs{
    padding:5px 5px 5px 0;
    margin:0;font-size:95%;
    line-height:1.4em;
    border-bottom:4px double #cadaef;
    }
  8. Find the following code in your template :
    <div class='post hentry uncustomized-post-template'>
  9. Copy and paste the code below exactly below the code <div class='post hentry uncustomized-post-template'>

    <b:if cond='data:blog.homepageUrl == data:blog.url'>
    <b:else/>
    <b:if cond='data:blog.pageType == &quot;item&quot;'>
    <div class='breadcrumbs'>
    Browse &#187; <a expr:href='data:blog.homepageUrl'>Home</a> &#187;
    <b:if cond='data:post.labels'><b:loop values='data:post.labels' var='label'>
    <a expr:href='data:label.url' rel='tag'><data:label.name/></a>
    <b:if cond='data:label.isLast != &quot;true&quot;'> , </b:if>
    </b:loop>
    </b:if> &#187; <data:post.title/>
    </div>
    </b:if>
    </b:if>
  10. Click Save Template button
  11. Wait for a while until your template saved
  12. Open your blog, click the title of an article, see the result
  13. Finished.
If your steps are correct, the “breadcrumb-navigation” will be like this:

breadcrumbsample


GL....
Read more

0 How to make element below of the header

Today, I will give you a new technique. With this, you will be able to make a new column, exactly below the header. Want to figure it out? Here we go……


In order to make a new column, we only need to put a little ‘spices’ like CSS code and HTML code in your template code. And this won’t be as hard as you imagine. Just follow my instructions below:

  • Log In to Blogger with your ID
  • Click Design
  • Click tab Page Element. Look at your layout template structure. Usually it will be like this:
 header elemen 
  • Next, click tab Edit HTML.
  • Click sentence Download Full Template, it is very important for you to backup this! 
  • Copy the code below, then paste it before code  ]]></b:skin>
#under_header{
margin:10px 0;
padding:1%;
width:98%;
}
  • Find out code which look exactly like this :  
<div id='header-wrapper'>
<b:section class='header' id='header' maxwidget="1" showaddelement="no">
<b:widget id='Header1' locked='true' title='test (Header)' type='Header'/>
</b:section>
    </div>
  • Copy the code below, and paste it exactly after that code :
<div id="under_header">
<b:section class='header' id='underheader' preferred='yes'/>
</div>
  • Click SAVE TEMPLATE buttons, and wait until your template saved.  
  • Click tab Page Element and your layout structure will be like this… 
 header_element 
 
  • Now you already have an element which placed exactly below your header. Feel free to add any elements do you wanted to. Want some Google Advertise, or maybe some photos, it’s all up to you!  

Codes that I have shown to you aren’t unconditional. That’s only the simplest codes, for making this tutorial. Feel free to change it and reconstruct it as much as you can. GL…
Read more

1 Create Read more With Background Color

Ah, this is still about “read more” and perhaps a few posts later will be about read more and its variations to be more attractive. Today’s post is about Create Read more With Background Color.

I recommend you to read my previous post about making the read more : Here

Commonly, the text “read more” is only the link text, but from its appearance, it’s rather unattractive. If you want to modify it in order to become more attractive, you can add the background, as first alternative.

for the demo you can see on the main page on this BLOG


The following is how to create read more with background color.
  1. Login to blogger with your ID.
  2. Click Design.
    blogger design
  3. Click Edit HTML.
    blogger edit html
  4. Backup your full template by clicking on the Download Full Template.
    download full template
  5. Find the code ]]></b:skin>
  6. Copy and paste the code below exactly above the code ]]></b:skin>
.jump-link a{
  -moz-border-radius:5px;
  -khtml-border-radius: 5px;
  -webkit-border-radius: 5px;
  padding:2px 12px;
  font-style: italic;
  border:1px solid #b7b7b6;
  margin:10px 0px;
  text-decoration:none;
  color:#000;
  background:#ccc;
  text-align:right;
  float:right;
}
.jump-link a:hover{
  border:1px solid #545353;
  color:#fff;
  background:#797878;
}
  1. Click SAVE TEMPLATE.
  2. Done.
The code above is an example. You can still change the CSS code as you desire, based on your blog design. The color given is gray, but you can change with other colors, e.g.
background:#ccc;
Replace the color code with your favorite color code, as:
background:# 1881f7;
If you have edited the code, don’t forget to Save Template.


Calling code css
  • Tick the small box beside the words Expand Widget Templates
expand-widget-templates
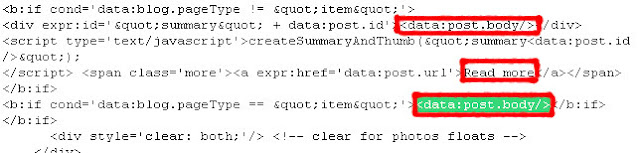
  • press Ctrl + F on your keyboard then write  <data:post.body/>  and hit Enter


<b:if cond='data:blog.pageType != &quot;item&quot;'>
<div expr:id='&quot;summary&quot; + data:post.id'><data:post.body/></div>
<script type='text/javascript'>createSummaryAndThumb(&quot;summary<data:post.id/>&quot;);
</script>
<span class='rmlink' style='float:right;padding-top:20px;'>
<a expr:href='data:post.url'>&#187;&#187;&#160;&#160;read more</a></span>
</b:if>
<b:if cond='data:blog.pageType == &quot;item&quot;'><data:post.body/>
</b:if>
Just Replace rmlink to jump-link
  • so the code will be as below
<b:if cond='data:blog.pageType != &quot;item&quot;'>
<div expr:id='&quot;summary&quot; + data:post.id'><data:post.body/></div>
<script type='text/javascript'>createSummaryAndThumb(&quot;summary<data:post.id/>&quot;);
</script>
<span class='jump-link' style='float:right;padding-top:20px;'>
<a expr:href='data:post.url'>&#187;&#187;&#160;&#160;read more</a></span>
</b:if>
<b:if cond='data:blog.pageType == &quot;item&quot;'><data:post.body/>
</b:if>
  • CLick save template
  • if you have a problem or Question let me know and ill try to help
  • GL

Read more

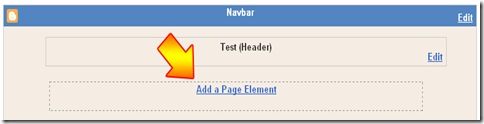
Delete this element to display blogger navbar

 
© 2010 Harajuku Collection is proudly powered by Blogger